使用git hook(钩子) git-commit检查文件是否可提交
在
git commit之前检查本地缓冲区的文件是否可提交
# 在当前项目git init初始化之后,隐藏目录.git里面会有hook目录
# 查看一下
tree -L 3 ./.git/
./.git/
├── COMMIT_EDITMSG
...
├── hooks
│   ├── applypatch-msg.sample
│   ├── commit-msg.sample
│   ├── fsmonitor-watchman.sample
│   ├── post-update.sample
│   ├── pre-applypatch.sample
│   ├── pre-commit.sample
│   ├── pre-merge-commit.sample
│   ├── pre-push.sample
│   ├── pre-rebase.sample
│   ├── pre-receive.sample
│   ├── prepare-commit-msg.sample
│   └── update.sample
├── index
...


# 这里只对 commit-msg.sample 进行修改,其它的hook文件这里不做讨论
# 重命名 commit-msg.sample 为 commit-msg ,即可生效钩子文件
编写
commit-msg文件校验逻辑(shell语法),我这里检测的是NOCOMMIT字符,搭配vscode插件wayou.vscode-todo-highlight更佳
#!/bin/bash

# 运行git diff --cached --name-only命令获取add到缓冲区的文件
STAGE_FILES=$(git diff --cached --name-only)
# STAGE_FILES=$(git diff --cached --name-only --diff-filter=A)

if [[ $STAGE_FILES = "" ]] ; then
    exit 0
fi

for proto in $STAGE_FILES;do
    # echo "检查 $proto"
    PROTO_TEXT=$(cat $proto)
	DO_NOT_COMMIT="NOCOMMIT"
	result=$(echo $PROTO_TEXT | grep "${DO_NOT_COMMIT}")
	if [[ "$result" != "" ]]
	then
        # 如果保存NOCOMMIT字符就禁止提交
		echo >&2 "包含NOCOMMIT,禁止提交: $proto"
		exit 1
	fi
done;

echo >&2 "所有文件检测通过"
exit 0
vscode的
wayou.vscode-todo-highlight配置,显示高亮
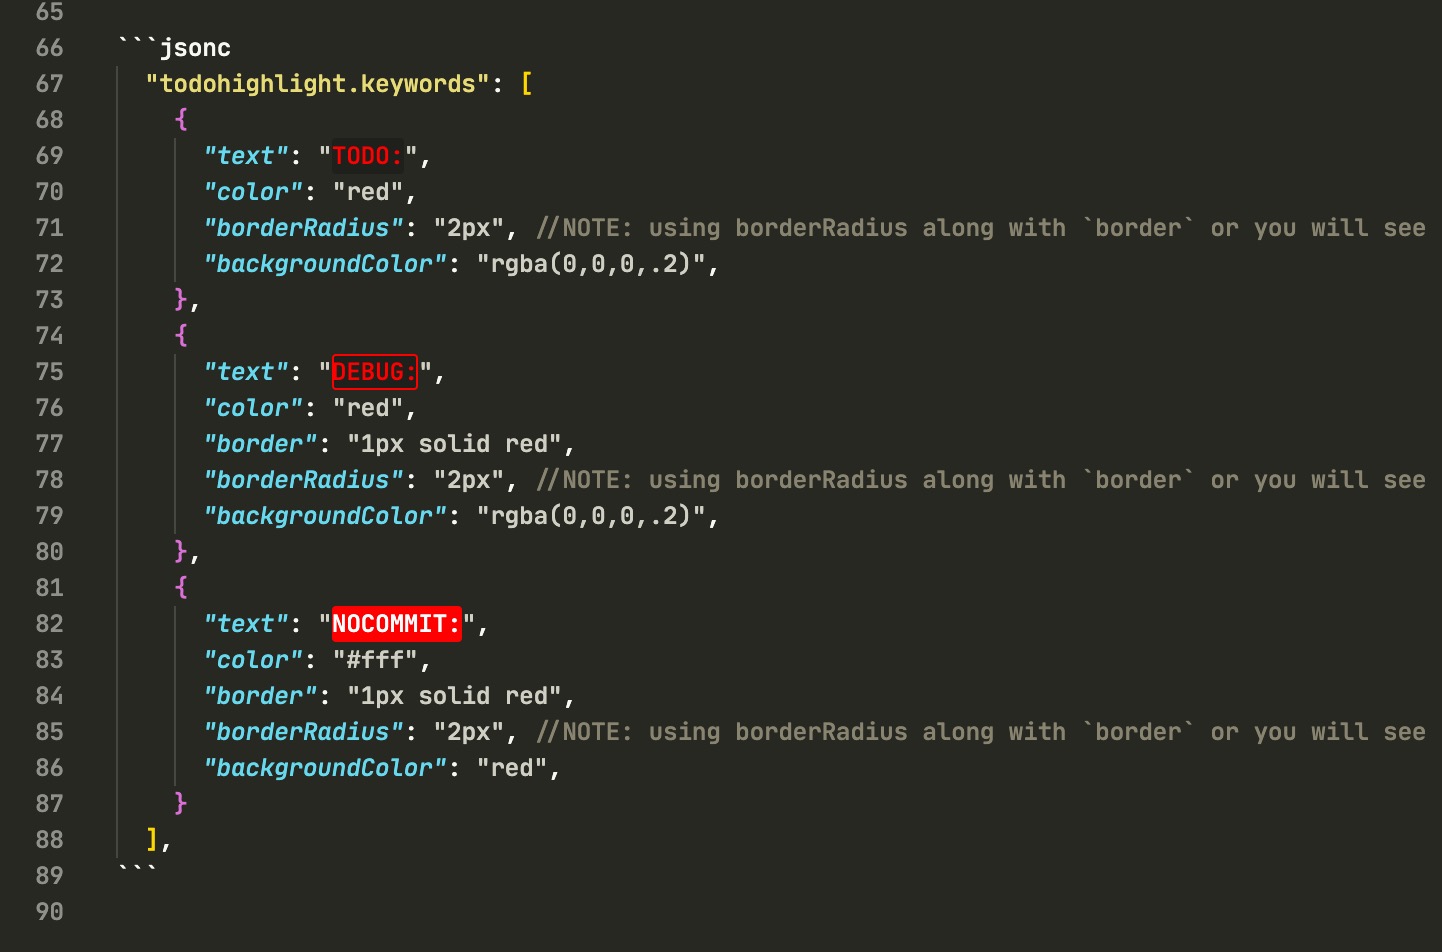
  "todohighlight.keywords": [
    {
      "text": "TODO:",
      "color": "red",
      "borderRadius": "2px", //NOTE: using borderRadius along with `border` or you will see nothing change
      "backgroundColor": "rgba(0,0,0,.2)",
    },
    {
      "text": "DEBUG:",
      "color": "red",
      "border": "1px solid red",
      "borderRadius": "2px", //NOTE: using borderRadius along with `border` or you will see nothing change
      "backgroundColor": "rgba(0,0,0,.2)",
    },
    {
      "text": "NOCOMMIT:",
      "color": "#fff",
      "border": "1px solid red",
      "borderRadius": "2px", //NOTE: using borderRadius along with `border` or you will see nothing change
      "backgroundColor": "red",
    }
  ],
实现效果
╭─jcleng@bogon /Volumes/D/work/yuedu  ‹system›  <master*>
╰─$ git commit -m "提交"
包含NOCOMMIT,禁止提交: app.js
使用git diff来提取更新包
# 安装zip命令
nix-env -i zip
# 比较2次commitid,并压缩到update_test.zip
git diff 876ac7e9e735cd6b07f0f84a01bda0c326602fdb 021f28d1142a0df2ac472d941355d6731981e982 --name-only | xargs zip update_test.zip
zip命令使用
# 压缩
zip -r myfile.zip ./*
# 解压
unzip -o -d /home/sunny myfile.zip
#!/bin/bash

# 运行git diff --cached --name-only命令获取add到缓冲区的文件
STAGE_FILES=$(git diff --cached --name-only)
# STAGE_FILES=$(git diff --cached --name-only --diff-filter=A)

if [[ $STAGE_FILES = "" ]] ; then
    exit 0
fi

for proto in $STAGE_FILES;do
	DO_NOT_COMMIT="NOCOMMIT"
	result=$(grep -c "$DO_NOT_COMMIT"  "${proto}")
	if [[ "$result" != 0 ]]
	then
        # 如果保存NOCOMMIT字符就禁止提交
		echo >&2 "包含NOCOMMIT,禁止提交: $proto"
        echo "$result"
		exit 1
	fi
done;

echo >&2 "所有文件检测通过"
exit 0
服务器上git仓库部署钩子自动更新
# 本地最新的代码提交到github/gitee/coding等服务器, 注意: 服务端的代码一定是分支完整的(不能浅clone和部份分支), 否则本地分支无法推送

# 然后先在线上服务器指定的web目录拉取最新的代码并部署成功(最好使用授权key拉代码, 服务端就可以无须登录)
cd /root/web && git clone https://jcleng:[email protected]/jcleng/prasite.git
# 或者使用gitee的把服务器本地公钥(ssh-keygen -t rsa)传到项目配置里面, 然后使用SSH拉代码, 也无需登录
cd /root/web && git clone [email protected]:xxx/xxxxxxxx.git
# 编辑服务器的hook
vim .git/hooks/post-update


#!/usr/bin/env sh
echo "✨HOOK...post-update..."
unset GIT_DIR  #很关键
NowPath=`pwd`
DeployPath=$(dirname "$PWD") # 就是当前项目
cd $DeployPath
# 线上不要保存任何更改,重置到origin/main分支
git add --all && git stash
git fetch --all
git reset --hard origin/main
# 或者直接重置到main,无须拉取
git reset --hard main

cd $NowPath
echo "🎉同步完成"
exit 0

# 增加权限
chmod +x .git/hooks/post-update
# 并设置服务端可推送代码
[receive]
denyCurrentBranch = ignore


# 用户端,增加服务器的远程地址
# 测试是否可以拉取:
# git clone [email protected]:/root/web/prasite
git remote add myonline [email protected]:/root/web/prasite

# 手动编辑并增加端口号
[remote "myonline"]
	url = ssh://[email protected]:22/root/web/prasite
	fetch = +refs/heads/*:refs/remotes/myonline/*


# 用户端推送到服务器(如果不设置hook代码并没有切换分支的, 需要设置以上hook)
# 先推主分支, 因为hook会切换到主分支
git push
# 再推送服务器上的分支才能触发hook
git push myonline
其他, 把本地rsa上传到服务器上,无须密码进行推送git
# 把本地rsa上传到服务器上,无须密码进行推送git
# 本地电脑执行
ssh-keygen -t rsa
# 本地key写到线上, 需要指定用户目录
ssh [email protected] "mkdir -p /root/.ssh/"
ssh [email protected] "echo $(cat $HOME/.ssh/id_rsa.pub) >> /root/.ssh/authorized_keys"
ssh [email protected] "chmod 600 /root/.ssh/authorized_keys"
ssh [email protected] "chmod 700 /root/.ssh/"
# 可以进行设置(测试在gitbash生成公钥无法登录, 但在pwshell可以登录), 一般无需设置
ssh [email protected] "echo 'StrictModes no' >> /etc/ssh/sshd_config"
ssh [email protected] "echo 'PermitRootLogin yes' >> /etc/ssh/sshd_config"
ssh [email protected] "echo 'PubkeyAuthentication yes' >> /etc/ssh/sshd_config"
ssh [email protected] "echo 'RSAAuthentication yes' >> /etc/ssh/sshd_config"